Wednesday, February 13, 2013

Pre-requisites – XenDesktop Controller


Citrix XenDesktop Desktop Controller

Pre-requisites XenDesktop Controller


Desktop Controller Pre-requisites
 
The requirements for installing XenDesktop Controllers include the Controller software, a database, Desktop Studio, Desktop
Director & Active Directory accounts.  Active Directory & SQL Databse account validations have already been performed as part of
Section 1 Environment Validation.  This section will focus on prerequisites for installing XenDesktop Controller software, Desktop 
Studio, and Desktop Director.  
 
XenDesktop Controllers must be installed on one of the following operating systems:
•Microsoft Windows Server 2008, Standard or Enterprise Edition, with Service Pack 2 installed (32- and 64-bit) 
•Microsoft Windows Server 2008 R2, Standard or Enterprise Edition (64-bit only)
 
Disk space requirements:
•100 MB for the Controller and SDKs
•50 MB for Desktop Studio
•50 MB for Desktop Director
 
This scenario will be performed on Windows Server 2008 R2 Enterprise with Controller & SDK installation, Desktop Studio on all
Controllers, & Desktop Director installed on one Controller.
Microsoft .NET Framework, Version 3.5, with Service Pack 1 is required to be installed on the operating system.  
If Microsoft .NET Framework Version 3.5 is not installed on this server, it is installed automatically by XenDesktop. The XenDesktop
installation media will also contain this installer in the Support\DotNet35 folder.
 
Microsoft Internet Information Services (IIS) and ASP.NET 2.0. IIS are required for Desktop Director.  Therefore, it will only be
installed on the first Controller in this scenario.  
•For Windows Server 2008, Microsoft IIS Version 7.0.
•For Windows Server 2008 R2, Microsoft IIS Version 7.5.
As Desktop Director will be installed on a Desktop Controller, this guide will be outlining the addition of IIS Version 7.5 with the
appropriate roles.  
 
Other components may be required depending on variations to the enterprise system environment.  Refer to Citrix eDocs for
XenDesktop 5 Controllers to gather specifics on  
•Microsoft Visual J# 2.0 Redistributable Package, Second Edition.
•Microsoft Visual C++ 2008 with Service Pack 1 Redistributable Package.
•Microsoft Windows PowerShell version 2.0.
•Internet Explorer 7.0 or later.
Screenshot
 
Description
·      Connect and authenticate to the server
selected to run the Desktop Controller.
 
**NOTE**
If using a service account to instal  the Desktop
Controller, ensure that the user account has
elevated privileges.  Consult with Active Directory
Administrators to ensure compliance with specific
enterprise account standards.  
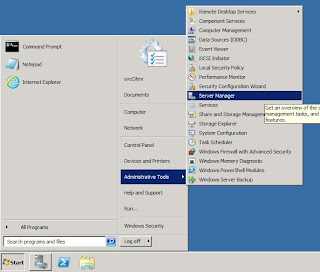
Launch Server Manager from the Start Menu.  
The path to Server Manager is Start >
Administrative Tools > Server Manager


Select the Roles tree node in the left hand
navigation pane.
 
·      Click Add Role
Agree to the Introductory Screen for the Add
Roles Wizard by clicking Next
 
·      Select Web Server role from the checkboxes
available
 
Agree to the screen that introduces IIS by
selecting Next
 
Ensure that all appropriate checkboxes are
selected. Many of these will be selected by
default.  Checkboxes include:
Web Server > Common HTTP Features >
     > Static Content
     > Default Document
     > Directory Browsing
     > HTTP Errors
Web Server > Application Development >
     > ASP.NET
     > .NET Extensibility
     > ISAPI Extensions
     > ISAPI Filterss
Web Server > Health and Diagnostics >
     > HTTP Logging
     > .Request Monitor 
Web Server > IIS Management Console
Confirm installation selections by selecting
Install at the prompt.  

Allow the installation to proceed to completion 
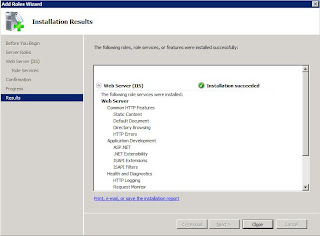
 
Validate that the installation completed                                      
·      If successful, click Close to complete the
installation the IIS Server Role. 
·      Close out Server Manager and return the
system.  It is now possible to to the installation
of Desktop Controller(s)


Tuesday, January 29, 2013

How to Configure Citrix client


How to Configure Citrix client

You can download the Citrix client from below link
http://www.gsi.de/informationen/wti/it/service/CitrixOnlinePluginFull.exe

You may need administrator privilege on your PC to install the ICA client software. Former versions will be uninstalled automatically. Save the plugin to your hard drive and follow the installation instructions.
After completing the installation, you will be asked for the Server Address. Please type: http://abc.com and click the Button Update.

Steps2
After that, type your Username, Password and Domain


Now the connection is configured.
You can see the status at the color of the icon in the right side of the taskbar (if you don't
see it, the inactive icons are activated. You can change this, with a right click on the
Taskbar, choose Properties, tab Taskbar and deactivate Hide interactive icons).


To start a desktop or application, click on the icon and choose Desktops → Desktop


How to Create a XenDesktop Desktop Image


How to Create a XenDesktop Desktop Image

Created On: Sep 23, 2011   /   Updated On: May 25, 2012
Average Rating: 4 (1 ratings)
Summary
This article describes how to create a XenDesktop desktop image.
Prerequisites for a Desktop Image Virtual Machine suitable for XenDesktop
This demonstration uses a XenServer host with sufficient memory and CPU resources available to host a Windows 7 Virtual Machine.
Recommended configuration is - 2 Virtual CPUs and 2048 MB of Memory.
A Workstation running XenCenter is needed in order to manage the creation of the Virtual Machine.
Procedure
Create a Pooled Desktop Image Virtual Machine
  1. From a management workstation, start XenCenter and connect to an environment for hosting the pooled desktop virtual machine.
  1. Select the XenServer host to contain the pooled image virtual machine.
  2. Right click and select New VM…
  1. On the Select a VM template screen, scroll through the selections and choose Windows 7 (64-bit).
    Note: The selection in this step varies depending on the operating system for the virtual desktops required by the enterprise.
  1. Click Next to continue.
  1. Provide a Name and Description for the master image virtual machine.
  2. Click Next to continue.
  1. Specify the operating system media location.
  2. For the purposes of this guide, select the button labeled Install from ISO library or DVD drive:
  3. Specify the ISO or media file containing the operating system installation files.
  4. Click Next to continue.
  1. Select Place the VM on this server.
  2. Choose the XenServer to host the virtual machine.
  3. Click Next to continue.
  1. Specify the desired Number of vCPU (virtual CPU) and Memory resources to allocate to this virtual machine.
  2. Click Next to continue.
  1. Select the desired storage location for this virtual machine.
  2. Click Next to continue.
  1. Configure the virtual network interfaces per specific enterprise standards.
  2. Click Next to continue.
  1. Review the summary screen to ensure accuracy of all settings.
  2. Ensure that the checkbox marked Start the new VM automatically is selected.
  3. Once all settings have been validated, click Finish to allow XenServer to create the virtual machine.
  1. In XenCenter, select the XenServer machine specified to host the master image virtual machine.
  2. Navigate to the Logs tab to monitor the progress of the virtual machine creation.
  3. Ensure to select Start the new VM automatically.
  4. Once all settings have been validated, click Finish to allow XenServer to create the virtual machine.
  1. If no errors occur during virtual machine creation, the new virtual machine is viewable in the navigation tree in XenCenter.
  1. Select the new virtual machine and navigate to the Console tab.
  2. Proceed with the installation of the operating system and all required software.
Configuration and Virtual Desktop Agent Software Installation
  1. In XenCenter, select Master Image VM.
  2. In the DVD Drive1 area for the virtual machine, select xs-tools.iso to mount the XenServer Tools media.
  1. Connect and authenticate to the machine being used for the master image.
  1. Open My Computer and navigate to the DVD-ROM.
  2. Right-click the XenServer Tools media and select Open AutoPlay.
  3. Select Run xensetup.exe from the AutoPlay prompt.
  1. Accept the term of the License Agreement by selecting I accept the terms in the License Agreement and clicking Next.
  1. Select the path to install XenServer Tools. The default being C:\Program Files (x86)\Citrix\XenTools
  2. After specifying the installation location, click Install to begin the process of installing XenServer Tools.
  1. Allow the installation program to proceed to completion.
  1. When the installation has completed, select Reboot now and click Finish.
    Note: The Windows 7 workstation automatically reboots upon clicking Finish. Save any unsaved work prior to completing this step.
  1. Once the client virtual machine has fully restarted, in XenCenter, select the master image virtual machine.
  2. In the DVD Drive1, locate and specific the file containing XenDesktop 5 media.
  1. Connect and authenticate to the machine being used for the master image.
  1. Open My Computer and navigate to the DVD-ROM.
  2. Right-click the XenDesktop media and select Open AutoPlay.
  3. Select Run AutoSelect.exe from the AutoPlay prompt.
  1. Select Install Virtual Desktop Agent.
    Note: Ensure that the user account being used to install the XenDesktop Virtual Desktop Agent has elevated privileges.
  1. Select Advanced Install at the screen to select the type of installation.
Note: In this enterprise scenario, all applications are installed locally. Therefore, XenApp Application Delivery plug-ins are not required.
  1. Clear the box marked Support for XenApp Application Delivery.
  2. Verify that the installation location for the Virtual Desktop Agent is appropriate for the environment. The default is C:\Program Files\Citrix
  3. Once the installation location is verified, click Next to begin the Virtual Desktop Agent installation.
Note: In this enterprise scenario, the Desktop Controllers are configured for the Virtual Desktop Agent. This can be done at a later stage by using Group Policy or the setup wizard.
Note: If using XenDesktop 5.6:
Select Virtual Desktop Agent or Virtual Desktop Agent for HDX 3D Pro and click Next.
  1. if you want to install the Citrix Receiver and click Next.
Select Yes if you want to enable personal vDisk and click Next.
  1. Select Manually enter controller location(s).
  2. In the input box, specify the fully qualified domain name (such as controller1.domain.com) of the Desktop Controllers configured earlier in this guide. If there are multiple controllers, enter each controller’s fully qualified domain name separated by a space.
  3. Click Check to allow the setup wizard to validate the network presence of the specified controllers. This option does not validate whether the Fully Qualified Domain Name provided is actually a controller, so ensure that the actual Desktop Controllers is specified and not another server.
  4. Once the Desktop Controllers are verified, click Next to proceed to the next step in the Virtual Desktop Agent installation.
  1. Validate all settings for the Virtual Desktop Agent configuration. Default settings have the following selected (enabled):
    XenDesktop Controller Communications
    Optimze XenDesktop Performance
    User Desktop Shadowing
    Real Time Monitoring
Note: These settings create various exceptions for ports in Windows Firewall. Consult with the Desktop Security team to ensure that settings comply with enterprise standards. Refer to the Knowledge Center article CTX126969 – Virtual Desktop Agent Configuration for more information regarding these settings.
  1. Once all settings have been validated, click Next to proceed to installation Summary validation for the XenDesktop Virtual Desktop Agent.
  1. If using XenDesktop 5.6:
  2. Once all settings have been validated, click Next to proceed to installation Summary validation for the XenDesktop Virtual Desktop Agent.
  1. Review the installation Summary for accuracy of Install Location and Components.
  2. If the Summary is correct, click Install to proceed with the installation.
  1. If using XenDesktop 5.6:
  2. If the Summary is correct, click Install to proceed with the installation.
  1. Allow the wizard to install components and perform Post Install validation.
  1. Upon successful completion of the wizard, a screen appears showing which components were installed. Validate that the XenDesktop Virtual Desktop Agent is presented.
  2. Select Restart Machine (required to complete install) and click Close to end the installation of the XenDesktop Virtual Desktop Agent.
    Note: The Windows 7 workstation automatically restarts upon clicking Close. Ensure that any unsaved work is saved prior to clicking Close.